 — Recommendations are independently chosen by Reviewed’s editors. Purchases you make through our links may earn us a commission.
For four years, I was the chef of a farm-to-table restaurant that primarily served pizza and pasta. It was a lot of work, but we made our pasta dough from-scratch every day. Working with fresh pasta made me realize how much better it is than the dried stuff. Unlike dried pasta (which can take 8 to 12 minutes to boil), homemade pasta only requires a few minutes to cook and it results in a light, springy noodle with a texture that can't be beaten. When I left the restaurant, I went into serious pasta withdrawal; I wasn't sure how I could live without it!
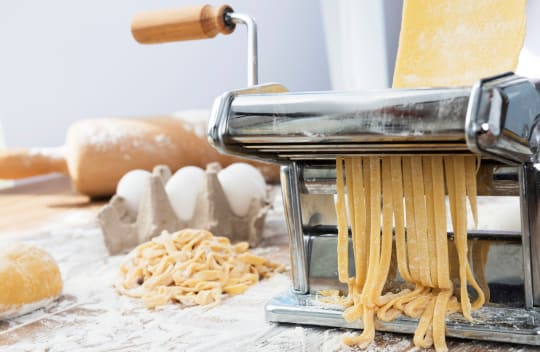
Luckily, it’s super easy to make pasta at home. At the restaurant, we used these huge, old-school Italian-made pasta extruding machines that cost thousands of dollars. Those things were pretty amazing, and they could make everything from flat pasta to shapes like rigatoni, cavatappi, and macaroni. While the shapes are pretty difficult to make at home, all you need is a hand-crank pasta machine to make flat pasta like spaghetti, fettuccine, ravioli, and lasagna. You just have to learn how to use one first!
How to choose a pasta maker
You don’t actually need a pasta maker to make homemade pasta. You could totally roll out pasta dough with a rolling pin and cut it with a regular old chef’s knife. That being said, the hard way is not always the best way! Instead, we’d recommend saving yourself the frustration and investing in a pasta maker. Depending on which route you want to go, they’re not all that expensive.
If you don't want to break the bank on a pasta maker, we’d recommend a hand-crank pasta machine, like the Marcato Atlas Pasta Machine (available at Amazon for $47.19). It’s easy to store and clamps onto the side of your countertop when you’re ready to use it. Using a manual pasta maker is a bit more time consuming than the automatic ones (which, we’ll talk about in a minute), but making pasta the traditional way is a ton of fun for the whole family.
On the other hand, if budget isn’t an issue and you’re looking for a quick and easy way to whip up pasta, look to the KitchenAid pasta attachment. The main benefit of this method is that both hands are free as you use it, so one hand can feed the dough through the roller while the other catches it as it comes out. Of course, you’ll need a KitchenAid stand mixer to make it work, so this option could get a bit spendy if you don’t already have one.
Our go-to pasta recipe
There are a ton of different pasta recipes out there. Some use whole eggs while others use egg yolks only, and you'll find recipes that call for semolina flour, all-purpose flour, wheat flour, or a combination. Our best advice is to find a recipe and master it. While pasta dough is extremely forgiving, it does take a few tries to get the hang of it. Don't get frustrated if it doesn't work out the first time!
If you already have a pasta recipe you love, that's great! If not, I'll lend you my go-to recipe:
In a large bowl, combine 300 grams of AP flour with a pinch of salt. Create a well in the center of the flour and add 3 eggs, 1 tablespoon olive oil, and 1 tablespoon water. You can go old-school and mix it by hand, combining the ingredients until they come together to form a dough ball before kneading it for 10 minutes. Or, you can take the easier route and toss everything into a stand mixer (our favorite is the KitchenAid).
Use a dough hook attachment and mix the ingredients until a ball forms around the hook. If it doesn't form within a few minutes, add a tablespoon of water at a time until it does. If it sticks too much to the sides, add a tablespoon of flour! Knead the dough in the mixer for about 5 minutes until it is super smooth. Then, wrap the ball tightly with plastic wrap and let it rest for at least 30 minutes before moving on to the next step.
The resting step is super important. While you're kneading, you're building a gluten network within the dough. This network creates that springy texture you love in noodles. If you don't let the dough rest, it will become pretty difficult to work with and you'll run the risk of breaking the gluten bonds, destroying the pasta's delicate chew. So...don't skip the resting step! You'll thank yourself for it later.
Pasta Tip: If you're running short on time, you can make the dough ahead of time and store it in the refrigerator for as long as two days (although, it will start to discolor after a few hours, which won't affect the flavor but it won't be quite as Instagram-worthy). You can also freeze it in a ziplock bag for up to three weeks. After it thaws in the refrigerator, try to remember to pull it out an hour before using it. I've found this dough is easiest to work with at room temperature.
How to use a pasta maker
Now that you've made your dough, you're ready to whip out your trusty pasta maker! We'll walk through the four easy steps: dividing the dough, laminating it, rolling it, and cutting it.
1. Divide the dough
This is the easiest part of the whole process! Using a bench scraper, divide the dough into four or six pieces. The goal here is to make it more manageable to work with–it would be super difficult to roll-out the entire dough ball at once! Keep the divided dough balls under plastic wrap to prevent them from drying out.
You'll likely need to flatten each dough ball before you put it through the machine. You can use a rolling pin, or you can use the heel of your palm (my preferred method). Then, dust it with plenty of flour so it doesn't stick to the machine and get ready to start laminating!
2. Laminate it
This term is usually used for puff pastry, croissants, and other baked goods that are folded with butter. The process of laminating creates alternating layers of butter and dough, creating hundreds of light, flakey layers. The reason to laminate dough (and the part that we're most interested in here with pasta) is to reinforce the gluten network. That not only creates a superior chew and a bitey texture, but it also makes the dough strong enough to roll it into super-thin sheets.
To start, flatten your flour-dusted dough ball and run it through the machine two or three times on the widest setting (usually "0" or "1"). Then, fold the sheet in half and run it through twice more. Finally, fold the sheet into thirds (like you're folding a letter), flatten it, and run it through two more times. Now, you're ready to change the setting on the knob and start rolling out the dough.
3. Roll it thinner and thinner
Once the dough is laminated, continue rolling it through the machine until it reaches the desired thinness. For best results, run the sheet through the rollers twice before turning the dial to the next setting. This helps prevent tears or jagged edges. You may have to cut it in half at some point if it becomes too long.
When you're done, the sheet will be very thin and delicate, so make sure you dust it with flour throughout the process to prevent the dough from sticking to itself. If it sticks too badly, there's a way to fix it, so don't worry! For most pasta, I like using the second-to-last setting on the KitchenAid (the one that's labeled "6"), or the "5" setting on the Marcato Atlas. If you're making a filled pasta like ravioli, thinner sheets are best since you'll end up folding the sheet over, doubling the amount of dough you eat at once. Play around with the thickness settings to find your favorite!
As you finish rolling each sheet, dust it with flour and store it on a baking sheet. If you live in a humid area, you might want to line the baking sheet with a piece of parchment paper to prevent it from sticking. Continue rolling until you've rolled all the dough. At this point, you can use the sheets as-is for lasagna, or you can fill them to make ravioli or agnolotti.
Test Kitchen Tip: If you accidentally tear a hole in the pasta, or you don't use enough flour and the dough sticks together in an unfixable way, you can always fold it in half and re-feed it through the machine (just like we did in the laminating step). Just make sure you start over at the widest setting or the dough will just rip again.
4. Cut your shapes
From here, all you need to do is hook up the cutting attachment, move the handle to the appropriate shape (if using a manual pasta maker), and get to cutting. The sheets are considerably easier to cut in half before you feed them through the cutter, so consider how long you'd like your pasta to be. I'm not a fan of super-long, "Lady and the Tramp" style noodles, so I usually cut my sheets so they're around 12 inches long.
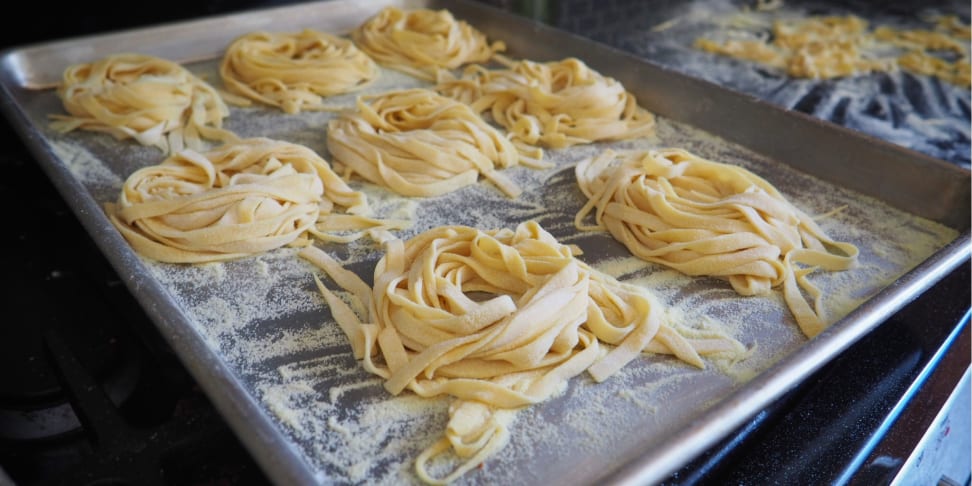
To prevent the noodles from sticking together as they come out, dust your sheet with flour before it goes into the cutter. Then, feed the sheet into the top of the cutting attachment and crank away. Catch it as it falls out, dusting it again if you feel it's necessary. Lay the cut noodles on a baking tray and continue cutting all the pasta. Then, roll them up into a delicate little ball (which makes a great photo, but also makes them easier to store).
If for any reason the noodles don't perforate or stick together badly, just ball the noodles up, re-laminate, roll out a new sheet, and re-cut it. Pasta is super forgiving that way! This time, when you go to cut them again, dust them with a bit more flour.
5. Cook (and enjoy)
As I mentioned earlier, fresh pasta cooks up super quickly. Thin noodles (like angel hair) are ready in as little as 60 seconds, and thicker noodles (like pappardelle) take only two minutes. So make sure your sauce is ready to go before dropping your noodles! Fresh pasta is best cooked in salted water (I like mine as salty as the sea) and tossed with sauce as soon as it's finished cooking. No need to rinse it or coat it with oil after draining; that will interfere with the sauce's ability to cling to the starch molecules on the noodles.
You can taste-test a noodle to make sure it's done, but it's finished when the pasta becomes lighter in color, floats to the top, and looks thick and expanded. Unfortunately, fresh pasta can't really be cooked "al dente" like dried pasta. No matter what you do, it will be soft, so don't try undercooking it to get that toothsome bite.
And there you have it, how to use a pasta maker in four easy steps! Just be forewarned: Once you start making fresh pasta, you'll be spoiled. You'll never want to go back to the store-bought kind again!
The product experts at Reviewed have all your shopping needs covered. Follow Reviewed on Facebook, Twitter, and Instagram for the latest deals, product reviews, and more.
Prices were accurate at the time this article was published but may change over time.
Related content
-

The Best Pasta Makers of 2020 best-right-now
 -

The Best Tea Infusers of 2020 best-right-now